The Ultimate Beginner Guide
Posted by on June 3, 2017.
Last updated by on February 7, 2024.
Contributions made by .
The Ultimate Beginner Guide will be going through major revisions shortly to account for changes in Update 2.4!
Getting Started
Secret World Legends is a 2017 relaunch of the 2012 MMORPG The Secret World. Although the relaunch has streamlined a lot of the systems and mechanics from the original game, Secret World Legends still stands out from most other games out in its genre. Below are a number of basic tips to help get oriented to the game, key ways that SWL differs from other MMOs, and some important things to keep in mind as you get started.
This is a very comprehensive guide. A Table of Contents is accessible from the red title bar at the top of this post, if you want to jump to a specific topic.
Classes and Levels
The Classes
Secret World Legends does not have the traditional MMO classes. Even though you choose a "class" in character creation, this is more of a starter class and not a permanent class. As you progress through the game, you will be able to unlock all the weapons and every single ability they offer, enabling you to customise your character however you want.
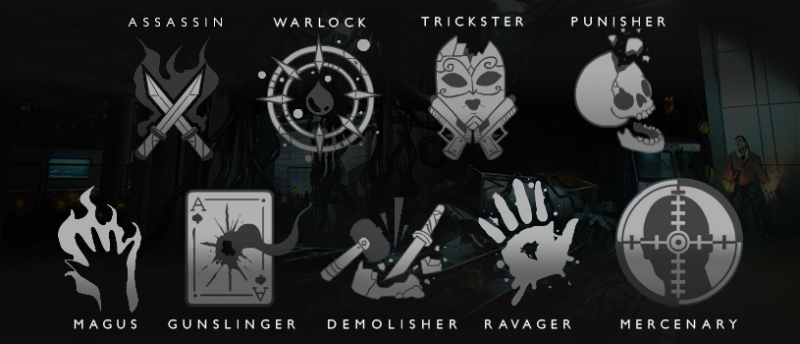
Here are all the starting classes:
- Assassin: Blade + Elementalism Focus
- Warlock: Blood Magic Focus + Assault Rifle
- Trickster: Chaos Magic Focus + Pistols
- Punisher: Shotgun + Hammer
- Magus: Elementalism Focus + Chaos Magic Focus
- Gunslinger: Pistols + Shotgun
- Demolisher: Hammer + Blade
- Mercenary: Assault Rifle + Fist Weapon
- Ravager: Fist Weapon + Blood Magic Focus
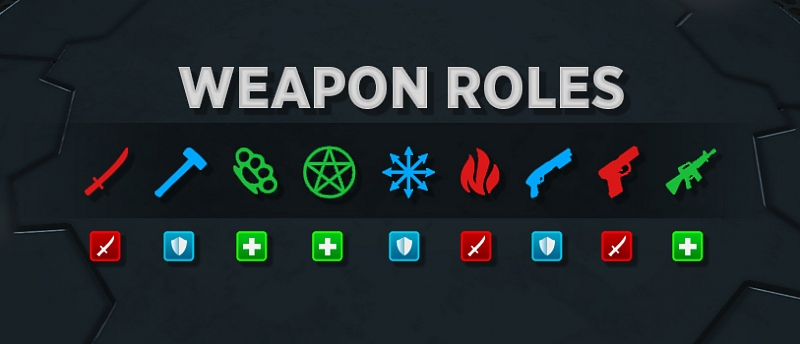
Weapon roles in group activities
Each starter class is biased towards a specific role, and so are their weapons. The list of starter classes above are colour coded based on their recommended role: Tank, DPS or Healer.
Hammer, Chaos Magic Focus and Shotgun are tanking weapons. They have abilities that generate an extremely high level of hate when used on NPC enemies, which is crucial when a tank needs to keep aggro to prevent bosses from attacking others. Damage dealers should never use those specific abilities in group activities. However, those weapons can be used in a damage dealing role as well, as long as you avoid the abilities that generate extra hate.
Blade, Pistols and Elementalism Focus are DPS weapons, mainly meant to be used for damage dealing. However, all the other weapons can also be used in a damage dealing role, at least as secondary weapon, since at least 50% of the abilities on each weapon page are damage based. Just make sure to avoid the hate generating abilities of tanking weapons.
Blood Magic Focus, Fist Weapon and Assault Rifle are healing weapons. They are the only weapons to offer pure healing abilities and group-wide healing abilities which are necessary to assume a healer role. Still, these weapons also have a selection of damage dealing abilities and can therefore be used in a damage dealing role as well to some extent.
XP and Levels
There are levels in Secret World Legends. You start at level 1 and the maximum level is 50. Every time you level up, your Maximum Health, Attack Rating and Heal Rating are increased, enabling you to face higher level enemies.
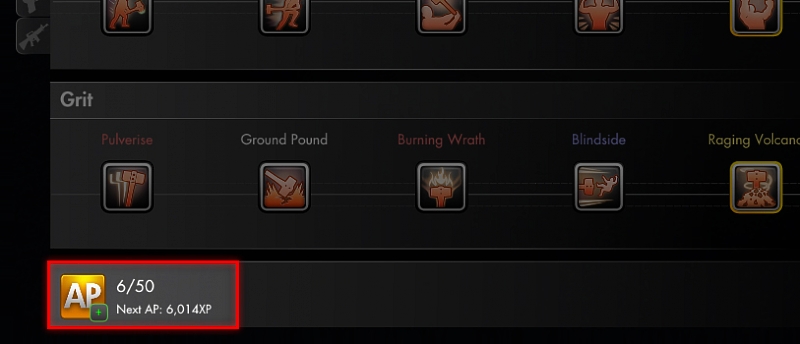
Characters also progress by earning Ability Points (AP) and Skill Points (SP) which can be used to buy active and passive abilities respectively. Characters never stop earning AP/SP, (even at level 50) and eventually you will be able to unlock all the weapons, skills and abilities – you have complete freedom to choose which weapons, skills and abilities to buy and equip.
Characters earn experience points (XP) and AP/SP for completing missions, decks, dungeons, finding legends, killing mobs and other achievements during the game. The XP bar at the bottom of the main screen displays the markers at which your character earns an AP/SP point and your progress towards your next level, both as a result of XP rewards. These thresholds change with each level.
There is a limit on the maximum number of AP/SP you can hold without spending. You can hold up to 50 AP and 50 SP. You can see how close you are to the limit by opening the Ability Window (press N).
Weapons and Abilities
When creating your character, you choose a starting class that grants you two specific weapons. However, you will eventually be able to purchase all weapons and unlock every single ability in the game.
In your character panel, you have two weapon slots. One for your primary weapon (left) and one for your secondary weapon (right). Your primary weapon generates energy twice as fast as your secondary weapon. This means you will be using your primary weapon more than your secondary weapon. This is important to remember when unlocking and slotting abilities. The majority of abilities on your ability bar should be tied to your primary weapon. Furthermore, one of the slots on your ability bar will be exclusively reserved for a basic ability from your Primary Weapon.
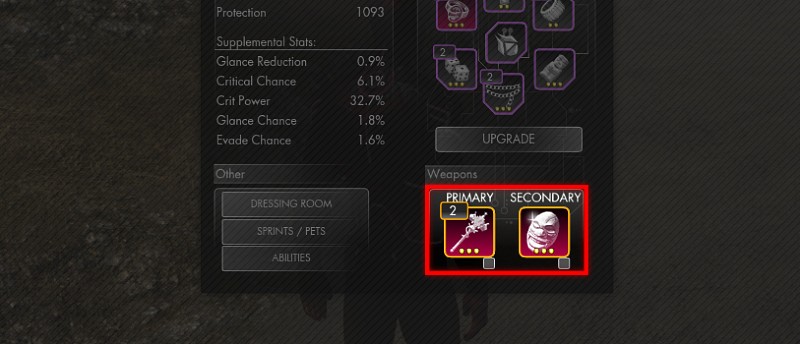
Weapon Specialities
Additionally, each weapon comes with unique gimmicks called specialities. Press (N) to open the ability window. From there, you can click in the [PLAY] icon in the upper right corner to view a video explaining the speciality of the weapon you are viewing.
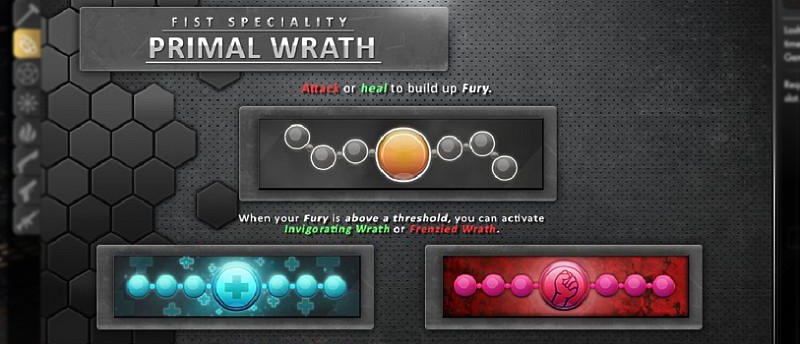
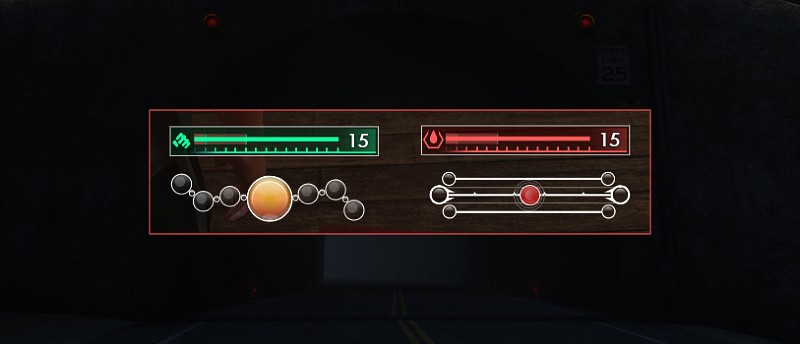
Weapon Resources
Near the ability bar, you will find both the weapon resource metres and the weapon speciality metres.
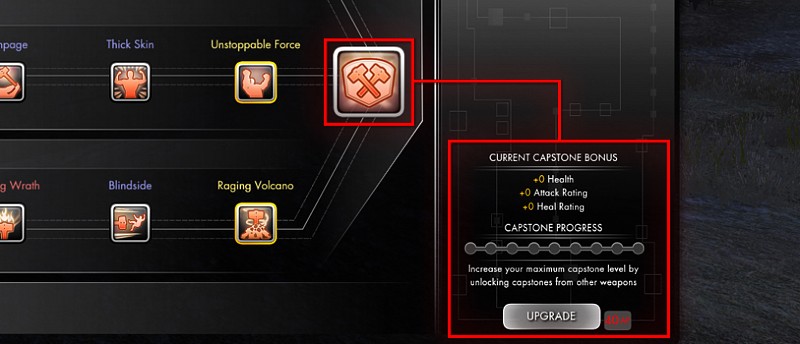
Capstones
Once you have purchased all the active abilities for one particular weapon, you will gain access to the capstones for that weapon. It can be upgraded 9 times and will provide better stats for your character with each upgrade.
However, at first you will only be able to unlock the first capstone. Each time you complete the Active Abilities page of a weapon, you will increase the maximum number of capstones you can unlock for each weapon. This means that you will have to unlock all the Active Abilities for ALL weapons in order to unlock ALL 9 capstones for each weapon.
Character stats
The stats panel you see in the Character Sheet (C) is a simplified summary of the stat gains from your level, your gear and your passive abilities. You can mouse-over each stat to view a tooltip describing how they are calculated and what they do.
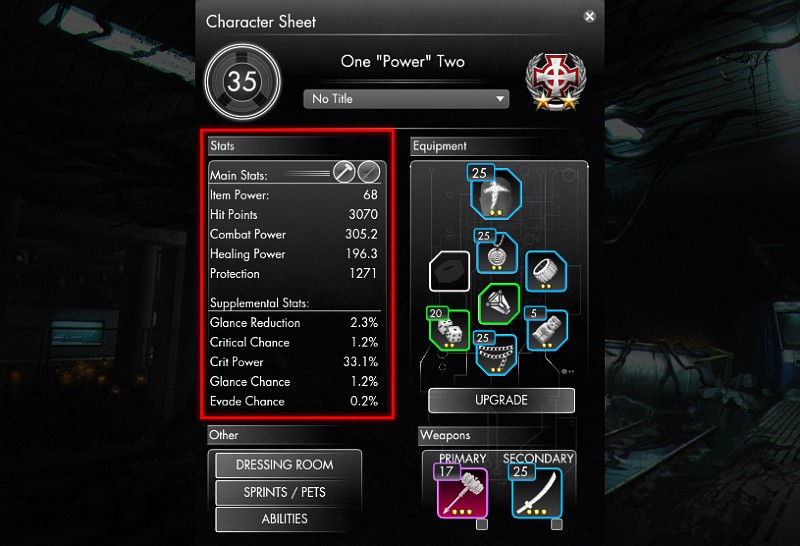
However, instead of explaining the simplified summary in the character sheet, it's better to explain the real stats that you find on your gear (talismans, weapons and glyphs). Continue reading below.
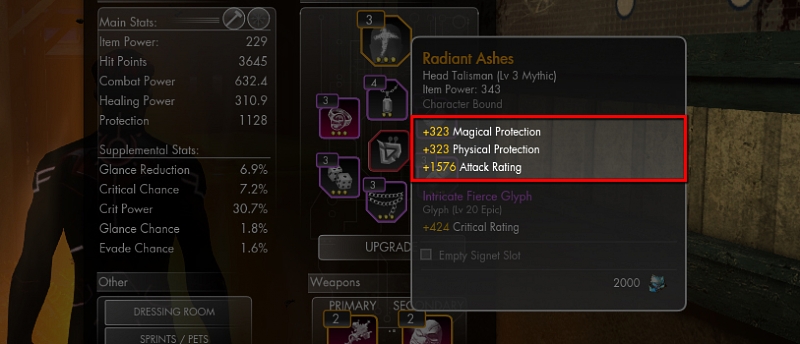
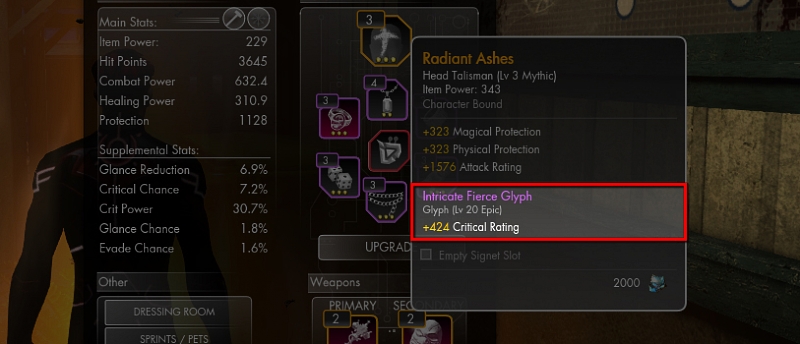
Gear stats
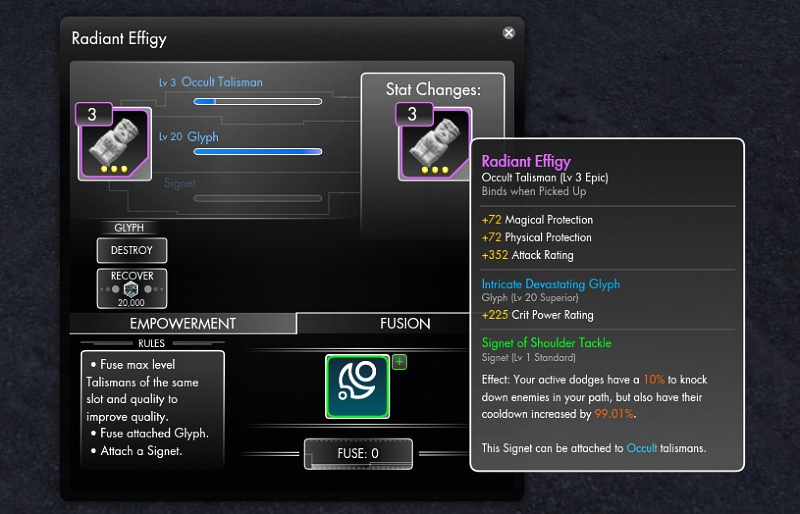
A substantial part of your character power comes from your gear. Your character can slot up to 7 talismans and 2 weapons at any given time. The power of each gear item increases with their level and rarity. All gear can be further empowered with Glyphs that add extra statistical bonuses, as well as Signets that grant unique effects.
Talisman Stats
Every talisman has a Power Rating stat. Power Rating can be allocated to one or more of the following stats:
- Hit Points - adds to your pool of hit points, which determines how much damage you can take before you are defeated.
- Attack Rating - increases your Combat Power stat in the Character Sheet. This determines how much damage you deal.
- Heal Rating - increases your Healing Power stat in the Character Sheet. This determines how much healing you do.
Additionally, all talismans have the Protection stat, which increases your damage mitigation. The higher this stat is, the less damage you take.
Weapon Stats
All weapons have the stat called Weapon Power, which together with Attack Rating and Heal Rating increase Combat Power and Healing Power respectively.
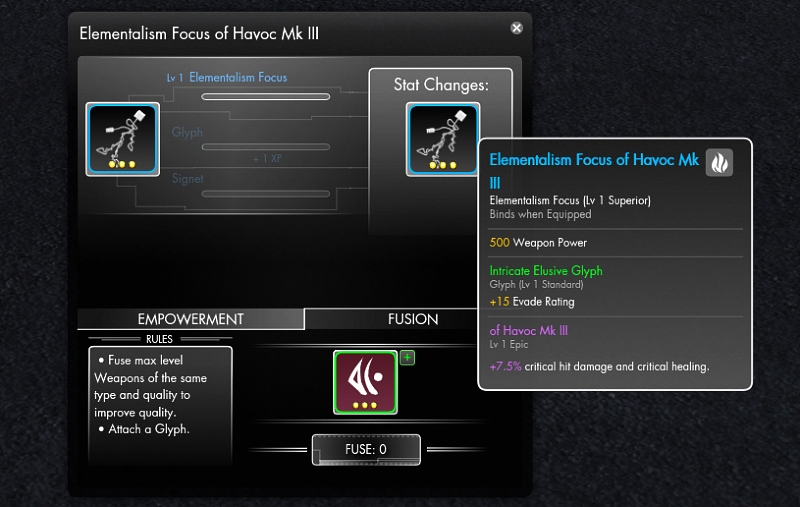
Glyph Stats
The following stats are gained from Glyphs, which can be inserted into Superior (blue) or higher talismans and weapons.
- Hit Rating - decreases the chance that your attack with glance your enemy. Glancing reduces the damage you deal by a significant amount, so decreasing the chance of that happening is beneficial. The more Defence Rating your enemy has, the more Hit Rating you need.
- Defence Rating - increases the chance that incoming attacks from enemies will glance you, thereby dealing significantly less damage. The higher your enemy's hit rating is, the more defence rating you need to achieve this.
- Critical Rating - increases the chance that your attack with critically hit your enemy or that you healing ability will critically heal your friendly target.
- Crit Power Rating - increases the power of your critical hits and critical heals.
- Evade Rating - increases the chance that you completely evade incoming attacks, thereby avoiding all damage.
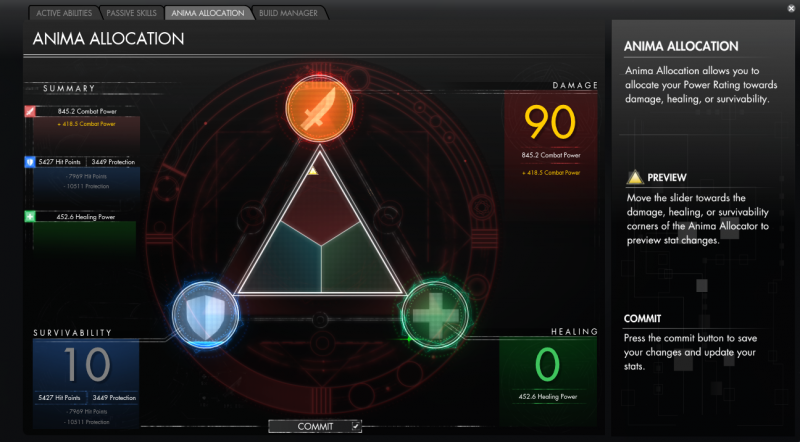
Anima Allocation
What stats are present on your talismans is based on your Anima Allocation. Every talisman has Power Rating, which through Anima Allocation is divided into Survivability, Healing, or Damage stats, in addition to Protection. Anima Allocation allows you to choose your own stat distribution. This system is unlocked at Level 20.
Anima Allocator
The Anima Allocator is accessed through the Ability Page (N) and allows you to choose your Anima Allocation stat distribution. By default, Anima Allocation is distributed at 90 Damage and 10 Survivability. Once Anima Allocation is unlocked, this can be changed. Stats can be distributed on a sliding scale throughout the three roles.
The following are associated with certain stats:
- Damage - Allocating Damage gives Attack Rating and minor Protection.
- Healing - Allocating Healing gives Heal Rating and minor Protection.
- Survivability - Allocationg Survivability gives Hit Points and major Protection.
The further into a corner of a role you allocate, the more Power Rating is distributed in favor of the stats associated with that corner.
To Allocate, slide the cursor to the desired distribution and hit 'Commit' at the bottom of the Allocator.
Gear properties
Each talisman and weapon have 3 properties that determine their power:
Level
All talismans and weapons start at level 1 and can be upgraded to higher levels by feeding them other gear and distillates using the Empowerment window.
Quality
Once an item has reached the maximum level (which is level 20 for the first quality), you can fuse two max-level items of the same kind into an item of higher quality. The level is reset to level 1, but with the increase in quality it will still be more powerful. Quality is analogous to Rarity to many. The Qualities are as follows:
- Standard - max level 20
- Superior - max level 25
- Epic - max level 30
- Mythic - max level 35
- Legendary - max level 70
Glyphs and Signets are limited to a maximum level of 20 for all quality levels.
Pips
The potential of a piece of gear is represented by the number of pips at the bottom of the item icon, normally ranging from 1 pip to 3 pips. 4 pips are available for Talismans and Glyphs through end-game content. The pips determine a very slight variance in the power of an item. For talismans and glyphs, this variance increases proportionally with the level and quality in the form of stats. Weapons of Mk I, II, or III vary solely by the power of their suffix in a static increase for every pip. The only way to change the number of pips of an item is to purchase an Anima Imbuer for 2,500 Aurum in the Fusion Window or Instant Purchase Window.
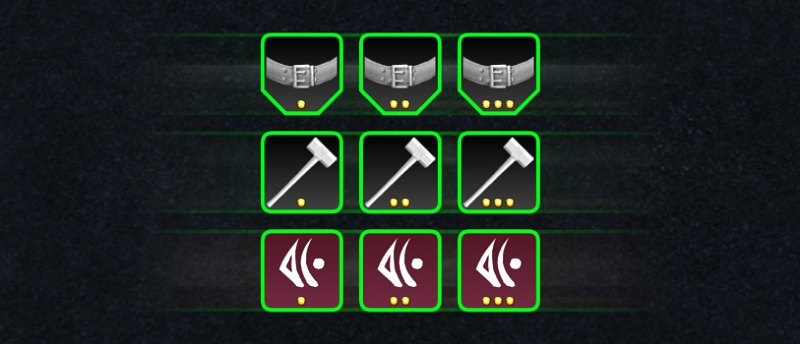
Talisman Pip Rarities: Faded, Luminous, Radiant, Resplendent
Weapon Pip Rarities: Mk I, Mk II, Mk III
Glyph Pip Rarities: Crude, Simple, Intricate, Elaborate
Signets have NO pips.
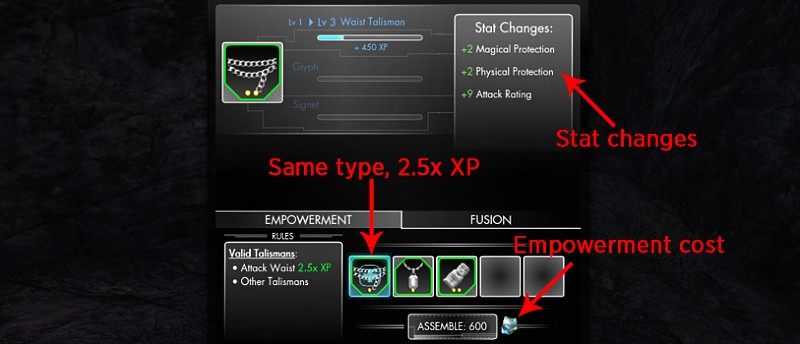
Gear Empowerment
Upgrading the Level of an Item
To upgrade a gear item to a higher level, simply feed it other gear that you don't want to keep! Talismans can only be empowered with other talismans, weapons can only be upgraded with other weapons, and the same holds true for other gear types, as well!
Empowerment is accomplished by placing the piece of gear you wish to empower (and preserve) in the top left slot of the Empowerment Window ([Y] by default) and placing all items you wish to empower it with into the slots at the bottom of the window, which fit up to a maximum of 5 items at a time. When ready, click 'ASSEMBLE'. The act of empowerment costs an amount of Anima Shards proportional to the number of items being consumed and the quality of the item being empowered by them. All items in the bottom bar
Empowering a talisman or a weapon with an item of the same subtype will make it grant 2.5x as much XP. For instance, empowering a Hammer with a Blade may give 100 XP, while a Hammer will grant you 250 XP (those numbers are just examples).
Empowering gear with something that already has experience will give additional XP to the destined item. To prevent players from unintentionally swapping what gets fed and what gets empowered and consequently losing your prized piece of gear, a warning prompt will appear any time you attempt to consume anything that has some XP on it toward its next level. Only you can confirm whether or not to sacrifice already leveled equipment to empower another!
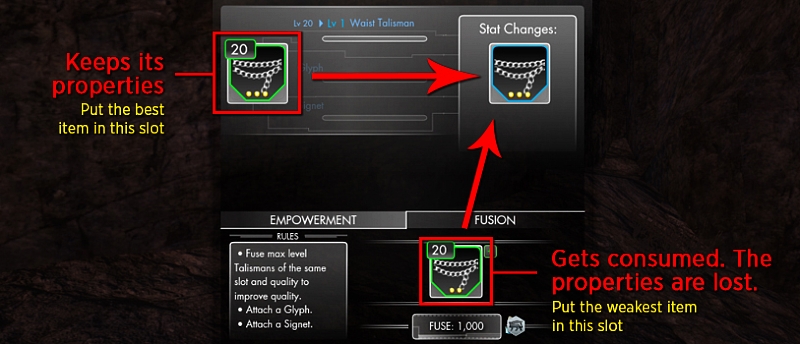
Gear Fusion
Talisman and Weapon Fusion
Fusion allows you to combine two identical types and quality of gear into something of even higher quality!
The first time you upgrade an item to level 20, the game will give you a broken Level 20 item of the same kind that you can use to upgrade it with. However, for all items beyond that, you will need to level up two items of the same type to the max level, then fuse them together to create an item of higher quality.
Two level 20 Standard Head Talismans will fuse into a Level 1 Superior Head Talisman.
Two level 25 Superior Hammers will fuse into a Level 1 Epic Hammer.
Two level 30 Epic Occult Talismans will fuse into a Level 1 Mythic Occult Talisman.
Two level 35 Mythic Assault Rifles will fuse into a Level 1 Legendary Assault Rifle.
Important! The item you put in the upper left corner of the Fusion window is the item that is upgraded. You get the Pips, glyphs and signets that the item in the upper left corner has. For example, when fusing a Radiant talisman with a Faded talisman, make sure that the Radiant talisman is in the upper left corner and the Faded talisman in the lower slot. The Faded talisman in the lower slot will then be permanently consumed, which upgrades the Radiant talisman to the next quality.
Glyph Fusion
Talismans and weapons of Superior (blue) or higher quality can have a Glyph inserted into them by Fusing the desired Glyph into the Talisman of choice. The glyph will provide you with one of the following secondary character stats: Hit Rating, Critical Rating, Crit Power, Defence Rating and Evade Rating.
Use the Fusion tab in the Upgrade window (Y) to insert a Glyph into the glyph slot of a talisman or a weapon.
Additionally, max-level glyphs can also be fused with another max-level glyph of the same type to create a higher quality Glyph.
Signet Fusion
Talismans of Epic (purple) or higher quality can have a Signet inserted into them, in addition to the glyph. Signets work differently from Glyphs in the way that they provide unique effects (which are often conditional) instead of raw stats. Signets are inserted the same way as Glyphs, using the Fusion tab in the Empowerment window (Y).
Additionally, max-level signets can also be fused with another max-level signet of the same type to create a higher quality Signet. For reference, a list of signets are available here.
Deciding on a build
Having covered the basic topics of weapons, gear, abiliites and stats, it's time to discuss how to use that knowledge to craft an effective build early on.
In this game, a specific selection of abilities and gear is usually called a build (sometimes also called a Deck). Early on you should decide what build you want to go for, including favoured weapons. You can expand your arsenal later on, but in the beginning you should focus on two specific weapons.
When you have decided on which weapons to use, you should acquire the best versions of those weapons and upgrade those. For example, you can buy green Mk III weapons on the auction house. Once you have the best base that early on, you don't need to go hunting for weapons of high quality later on. This will save you a lot of time and resources in the long term.
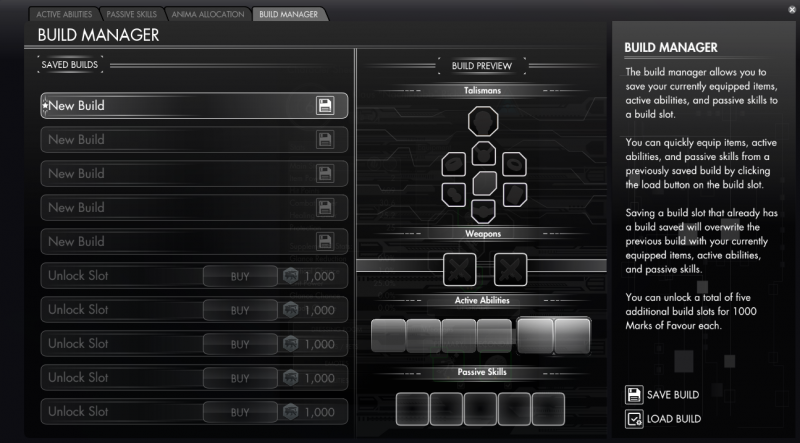
Build Manager
The Build Manager, accessed through the Abilities Page ([N] by default), allows you to save currently equipped weapons, talismans, active abilities, passive abilities, and Anima Allocation settings as a Build. Up to five Builds can be saved by default, but more slots can be purchased for 1 000 Marks of Favour each.
Once saved, a Build can be loaded, updated, or deleted from the Build Manager page, making it easy to swap between weapons or roles.
COSMETICS
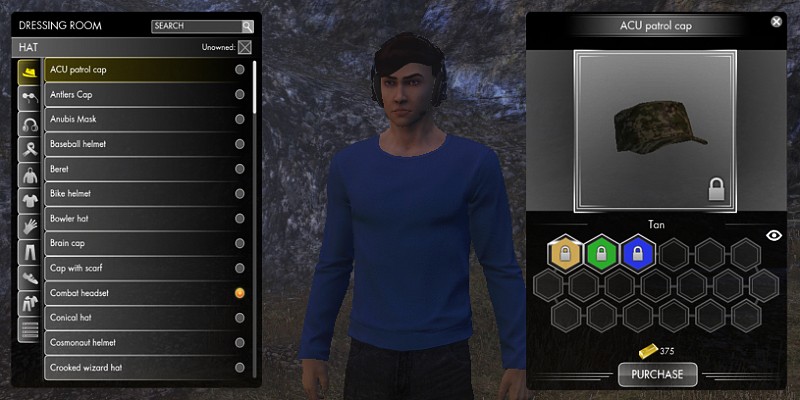
Clothing
Access the Dressing Room (Shift + I) to access your clothing options. A lot of clothing can be bought directly from within the Dressing Room as well, for either Marks of Favour or Aurum.
In the left window, you can browse the various slots (Hat, Face, Back, Legs, Uniform, etc.). The dots on the right side of the list indicate whether you own the clothing piece or not.
In the right window, you can see an image preview of the currently selected clothing piece. If there are multiple colour variations, you can also browse through them there. Clicking on a colour option will allow you to preview the clothing on your character in real-time. To stop previewing, simply click the colour option again or preview something else. This window will also display the source of an item, if available.
You can check out what other players around you are wearing by targeting them and accessing the Interaction Menu (Interaction (F) on a player) to select Inspect and see all sorts of information about the player character. If you happen to like what the other is wearing and your characters are the same sex, you can buy their clothing by pressing on the + on the cosmetic in question should it be available in the Inspection window and then following the prompts!
Clothing can come from many different sources, some of which may not appear at all in the Dressing Room until unlocked, so get out there and let your fashion shine!
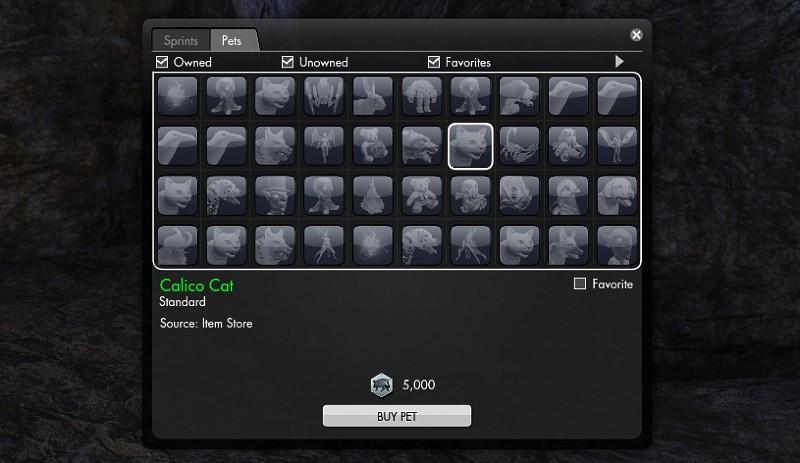
Pets
You access an overview of all Pets in the Pets window (Shift + P). The pets you don't own will be greyed out. Many can be purchased directly from the Pets window for Marks of Favour or Aurum. When selecting a pet, you can view the Source in the description, which explains where you can obtain the pet.
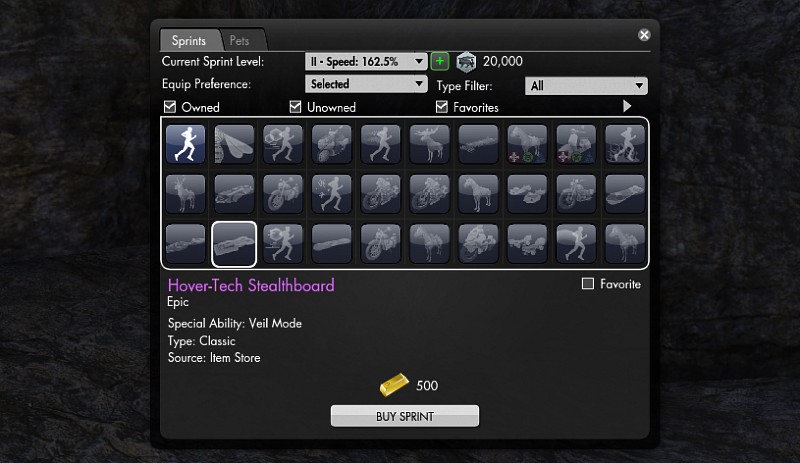
Sprints
The overview of your currently owned Sprints (and the ones you don't own) is found in the same window as the Pets. Select the Sprints tab. The sprints you don't own will be greyed out. Many can be purchased directly from the Sprints window for Marks of Favour or Aurum. When selecting a sprint, you can view the Source in the description, which explains where you can obtain it.
You can also upgrade your Sprinting speed directly from the Sprints window. Click on the green + icon near the top of the window of purchase the next Sprint upgrade. The first 3 upgrades can be bought with either Marks of Favour or Aurum, while the last 2 upgrades can only be bought with Aurum (though you can exchange MoF for Aurum on the Exchange to avoid spending real money).
Missions
The quests in this game, known as missions, require a bit more thought and may seem a little more difficult than in many MMOs. A mission may mark a particular area on the map, but may leave you to your own devices to solve certain puzzles or perform certain actions. The game is asking you, the player, to use your noggin a bit to figure things out. Remember what the quest giver told you in the cut scene, look at your mission log and/or lore for clues, sometimes use the in-game browser (B) to look up information.
Missions may test your critical thinking, reflexes, build/deck flexibility, situational awareness, understanding of the mission, your own character abilities or your knowledge of (or at least your ability to research) Egyptian Hieroglyphs! Even the Action missions can have a bit of thought involved; if you find yourself getting knocked on your rear repeatedly, it’s probably because you have forgotten a key element that will help you get through the situation (you’ll probably kick yourself after you find out what it is, too!). Missions are perhaps one reason why some talk of SWL being similar to single player games – mission challenges do share qualities with that genre. That said, there are plenty of group challenges (more on that below).
Contrary to other MMOs, it's often not necessary to “return to the hub” to turn in missions in SWL – you have a cellphone and can complete missions from anywhere. Think instead of the mission points as breadcrumbs rather than hubs – you can wander through the zone picking up as you go.
Missions usually have multiple tiers. You can have one Story mission, one Dungeon mission, one Action/Sabotage mission, one Investigation mission and three Side missions at any one time.
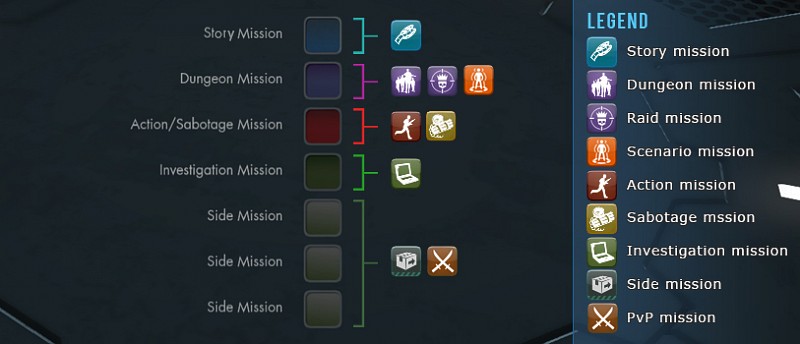
The Story mission carries through the entire game. You will not be able to complete it in one fell swoop. The story will frequently require you to reach a higher character level, which you can achieve by doing other missions in the various adventure zones.
Action missions are combat oriented while Sabotage missions typically require that you avoid combat and may involve some timing and dexterity. Investigation missions require puzzle solving and research skills and can take some time if you want to avoid using walkthroughs.
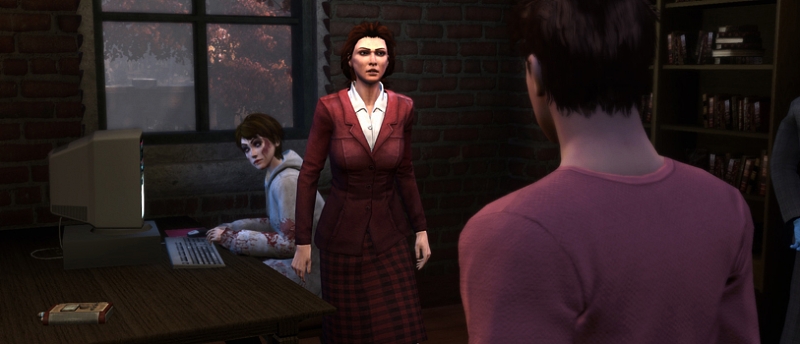
All missions with the exception of Side missions will have a cut-scene. In TSW watching the scene is much more important than in many MMOs; some key information may be revealed. Plus, they are generally quite entertaining and funny!
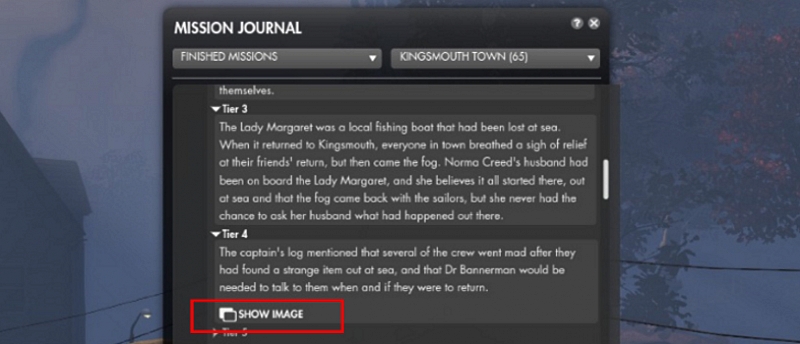
The Mission Journal
Your Journal also saves the images you sometimes view at the different tiers of the mission, so you can always open it up to review them again; they often contain important clues.
Pausing a Mission
You can pause a mission by clicking on the Pause icon in the Mission Journal (J). When you resume the mission later on, it will be saved at the same tier you left it at. You can also check your Mission Journal (J) to see which missions have been paused.
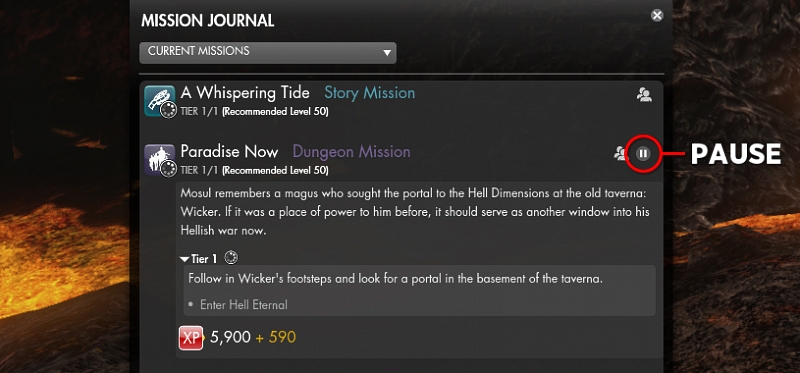
Sharing a Mission
You can share missions with other players in your group by clicking on the Share button in the Mission Journal (next to the Pause button) for an active mission. This will attempt to share the mission with players in close proximity, and will return feedback as to whether or not the mission can't be shared, if the other players already have the mission, or if a mission is successfully shared and with whom.
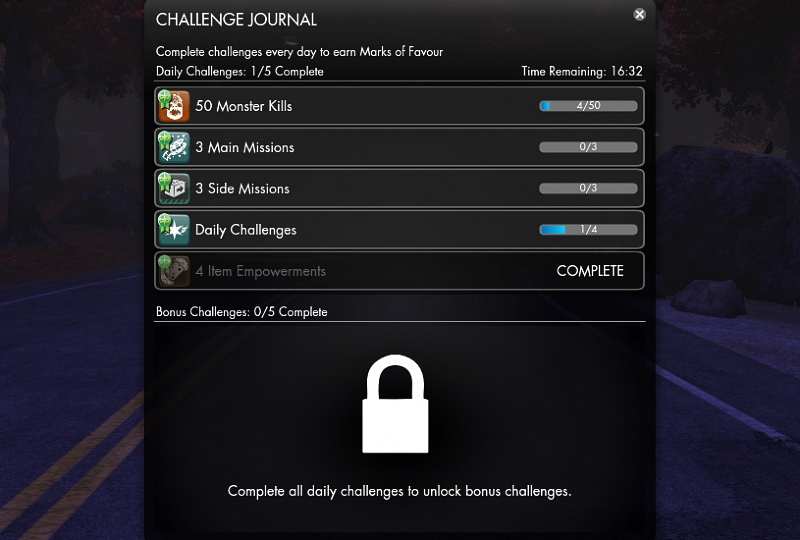
Daily Challenges
The Challenge Journal (Shift + J) offers a list of daily activities that you can complete to earn Marks of Favour. Once you have completed the first 5 challenges, you will unlock 5 bonus challenges. Completing all 10 challenges will earn you 10,000 Marks of Favour. If you are a Patron (paid subscription), you will earn 20% more Marks of Favour, allowing you to earn a total of 12,000 every day. However, this is only a soft limit as you can earn even more Marks of Favour by selling items on the Auction House.
Travel
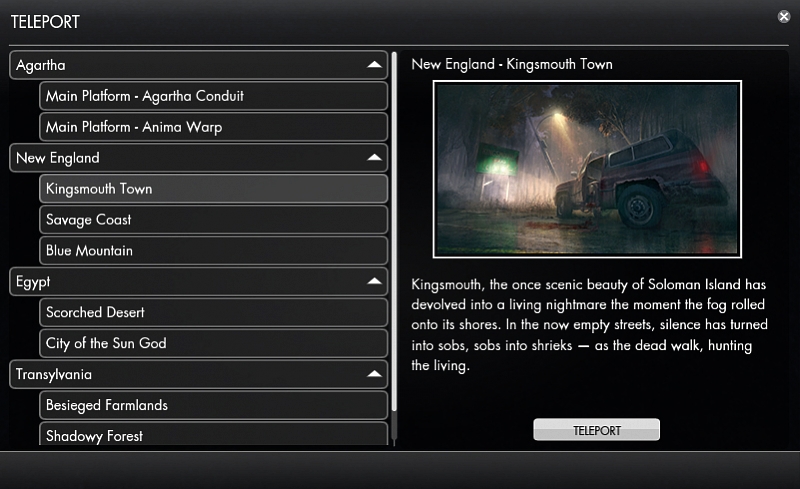
You can fast travel to previously discovered Anima Wells in your current zone. This is called Anima Leaping. Open the map view (M) and click on the Anima Well you wish to leap to. Unless you are a Patron (paid subscription), leaping to an Anima Well costs Anima Shards. The cost increases incrementally with each new zone.
Additionally, you can teleport to other zones from the Teleport window (Shfit + T). Once more, unless you are a Patron (paid subscription), teleporting to another zone costs Anima Shards. The cost increases incrementally with each new zone.
Currencies
The Wallet
To access your wallet, open your Inventory (I) and click on the "Wallet" button in the bottom right corner of the main inventory window. It can also be opened by clicking on your Anima Shard count on your topbar. The wallet provides an overview of your current stock of all the various currencies.
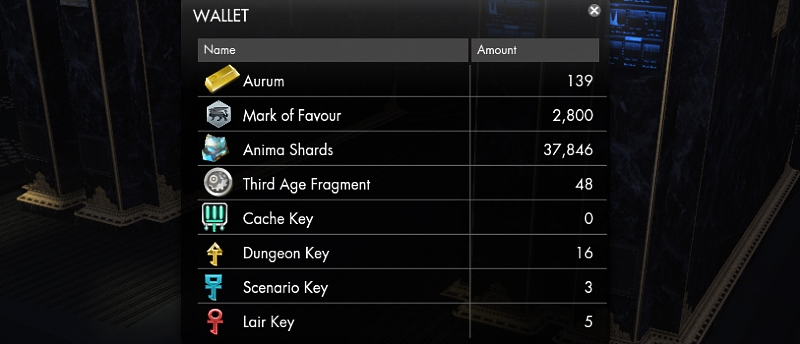
The Currencies Explained
Aurum is the game's premium currency, either bought with real-life money or with Marks of Favour on the Exchange (H). Aurum can be used to purchase a variety of items and services, such as Ability Points, Skill Points, Cache Keys, and much more! Aurum can also be exchanged into Marks of Favour on the Exchange (H).
Mark of Favour is the main currency earned ingame. You earn Marks of Favour by completing the Daily Challenges (Shift + J). Free players can earn up to 10,000 Marks of Favour from challenges every day, while Patrons can earn 20% more. You can earn even more Marks of Favour by selling items on the Auction House (H). You can sell up to 10 items every day.
Anima Shards is the secondary currency earned in-game. You earn Anima Shards by completing missions, killing monsters and from selling items to vendors.
Third Age Fragment is a premium currency received by opening Caches. Third Age Fragments can be used to buy gear and exclusive cosmetics from various vendors within the Hollowed Halls of Agartha.
HexCoins are a currency obtained by selling unwanted items from Agent Boosters to the Shadow Trafficker in Agartha. Through the Shadow Trafficker, HexCoins can be used to purchase Agent Dossiers and Agent Gear.
Dawn's Favour is a content-specific currency earned by completing missions in South Africa. It is used primarily to purchase exclusive cosmetics within that zone.
Cache Key is a premium key used to open Caches. Cache Keys can be acquired either by paying Aurum to buy them or by being a Patron, as Patrons receive a daily Cache Key when claiming the Daily Login Reward.
Epic Cache Key is a premium key to open Caches; however, unlike the normal Cache Keys, Epic Cache Keys guarantee one of the top-tier rewards from a Cache. Top-tier rewards include the Sprint, Pet, Outfit, or epic Talisman/Weapon Reward Bag exclusive to the Cache. Epic Cache Keys are only acquired by purchasing them from the Cache interface or from the Instant Purchase Window.
Dungeon Key is a key used to open Reward Chests within Dungeons of any difficulty. A Dungeon Key is consumed when a Dungeon Chest is open and the number of Dungeon Keys is refreshed daily. Dungeon Reward Chests appear after defeating a dungeon boss. Free-to-Play players have 12 Dungeon Keys per day whereas Patrons have 18.
Scenario Key is a key used to open Reward Chests within Scenarios of any type or difficulty. A Scenario Key is consumed when a Scenario Chest is opened, but Scenario Keys refresh daily. Scenario Reward Chests appear at the end of a Scenario. Free-to-Play players have 2 Scenario Keys per day and Patrons have 3.
Lair Key is a key used to open the Reward Chests that appear after defeating Lair and Regional bosses, as well as Megabosses. As with the other chest keys, they refresh daily. Free-to-Play players have 3 Lair Keys per day and Patrons have 6 Lair Keys per day.
When at 0 Dungeon, Scenario, or Lair Keys, additional Keys may be purchased for Marks of Favour when opening a Reward Chest that requires them.
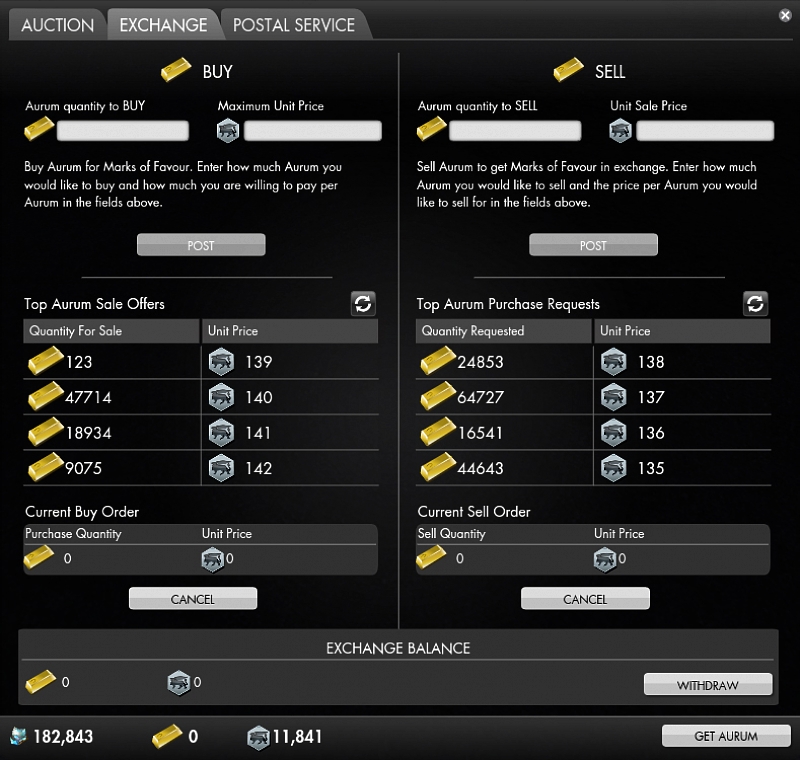
The Exchange
On the Exchange (H), you can trade Aurum for Marks of Favour and vice versa. You can specify your own Unit Price, but you should try to match the list of Offers and Requests as closely as possible if you don't want to wait too long for the transaction to go through.
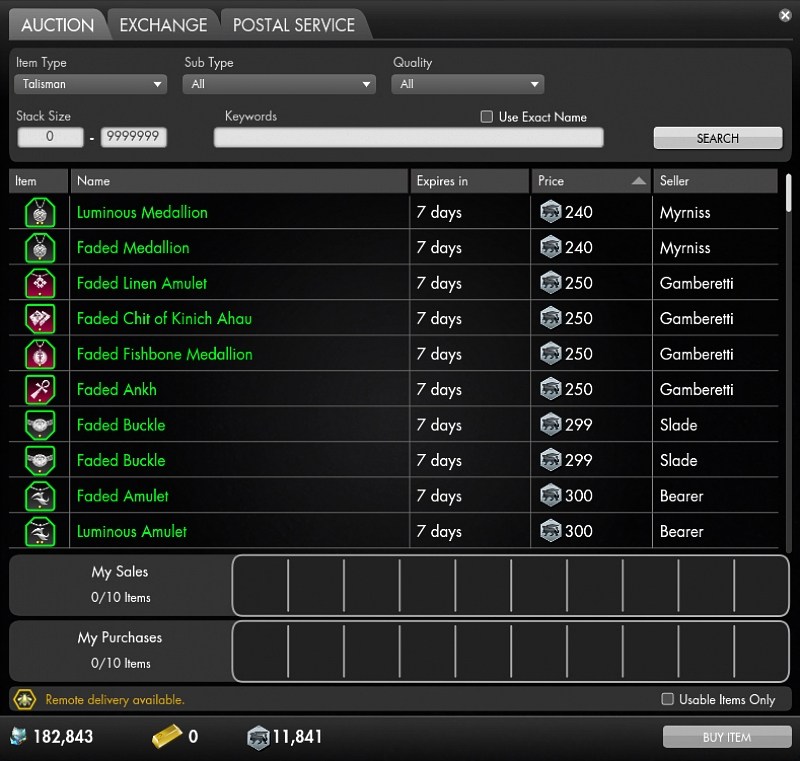
Auction House
The Auction House (H) is accessible from anywhere. In this window you can purchase items from other players, as well as put up your own items for sale. The currency used there is the Mark of Favour. You can sell up to 10 items at the same time, which occupy the top row near the bottom of the window. The bottom row is where the items you purchase from other players will end up. You need to claim the items from that row to bring them into your inventory. Only Patrons (players with monthly subscriptions) can claim purchased items from anywhere in the world. Free players will need to visit the Auction House in the Agartha mall area.
Bank
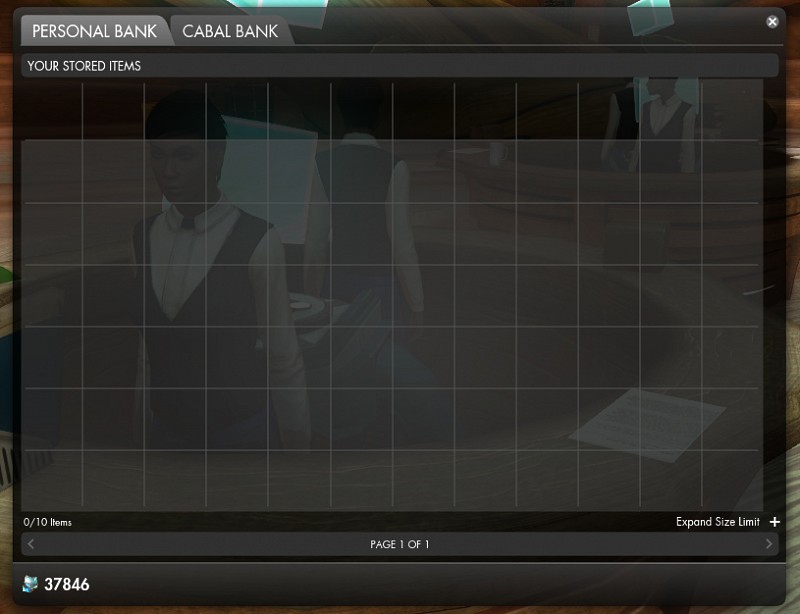
To access your bank, go to the Hollowed Halls in Agartha and interact with one of the bank tellers.
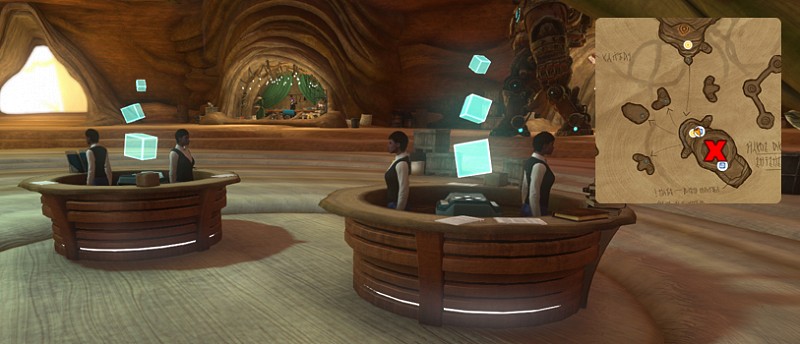 In the Bank window, you can access your personal bank, as well as the cabal bank (if you have joined/created a cabal). You can expand the size limit of your personal bank by clicking on the "Expand Size Limit" button in the lower right corner of the window, however, this is not free. The cabal bank cannot be expanded.
Grouping and Activities
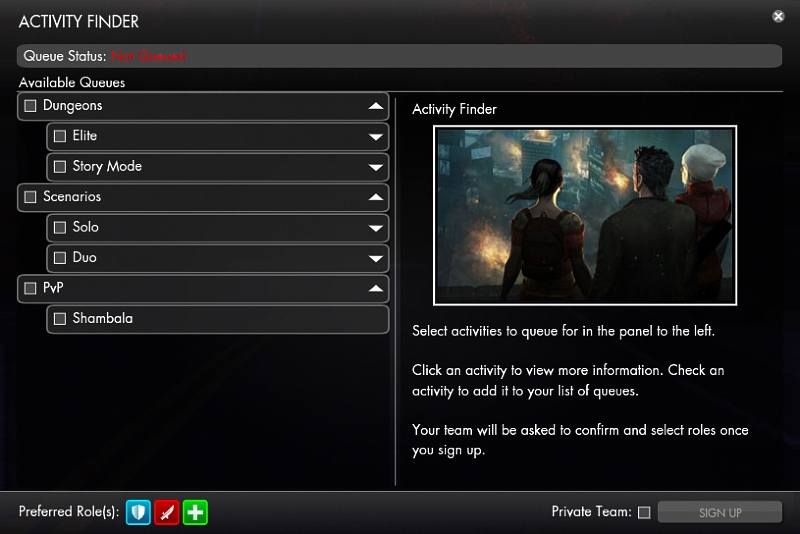
You can access the Activity Finder (Shift + V) to sign up for various endgame activities.
Story Mode dungeons are easier versions of the dungeons meant to be played mostly to experience the storylines within. Those versions do not require the typical holy trinity of tank, healer and damage dealers, but instead they are balanced around three (3) players using their solo builds. Story Mode dungeons have an upper level limit.
However, checking the Private Team option allows you to bypass the upper character level limit for Story Mode dungeons, if you have already outlevelled those before you have had a chance to complete them. Note that "Private Team" means that the Activity Finder will not find team members for you. Interestingly though, if you have advanced your character far enough, you will even be able to complete the Story Mode dungeons alone, without any help.
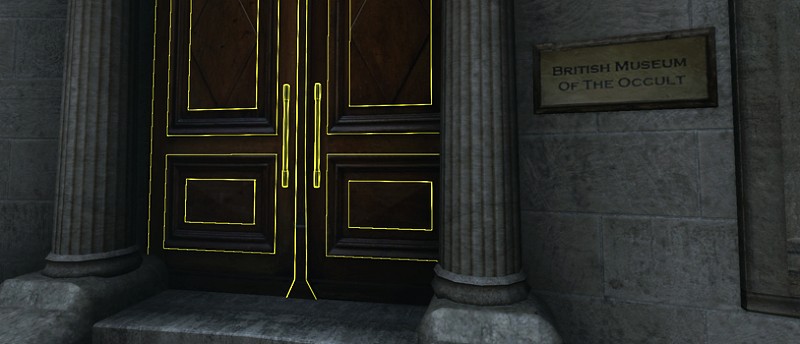
Museum of the Occult
The Museum of the Occult is located in London, right next to Temple Hall. It is a feature that allows for a personalized museum gallery. The Museum functions additionally as a form of horizontal progression, requiring the use of Anima Shards for pedestals within the museum and allowing eventual purchase of a series Gadgets known as Mnemonic Guardians, which aid a player in battle. A number of cosmetics can be purchased from within the Museum of the Occult and are unlocked as a player adds to their museum.
You can read more about the Museum in our Museum of the Occult Master Guide.
PvP
Shambala
Shambala is currently the only Player versus Player minigame in Secret World Legends. You can sign up for Shambala in the Activity Finder (Shift + V). In Shambala, two teams of 10 players each will go up against each other with only one goal: Defeat everyone on the opposing team. Basically, it's a Team Deathmatch.
There are some extra mechanics to watch out for though. Once the fight has begun, the arena will be enclosed in a circle protecting you from the lethal storm outside. As time passes, the safe area barrier will gradually shrink down until eventually it is only a few metres wide in diameter. This is to prevent matches from lasting too long.
Occasionally, powerful winds will build up and blow across the entire arena. When this happens, you must hide behind any of the solid structures in the arena to avoid being knocked back. If you are unlucky, you may even be knocked off the mountain cliff or outside the safe area, and die.
Powerful boosts will also spawn on the small platforms scattered all over the arena every now and then.
Roleplaying
This guide will not go into details on how to roleplay, there are lots of general "How to roleplay" guides on the internet. Instead, we will focus on where you can find other roleplayers hanging out.
You should join the chat channels #SWLRP and #OOC. Use the /chat join <channel> command to join a channel. The game constantly puts you in a randomly selected dimension. You will not see players residing in other dimensions, but you can meet up on them to join their dimension.
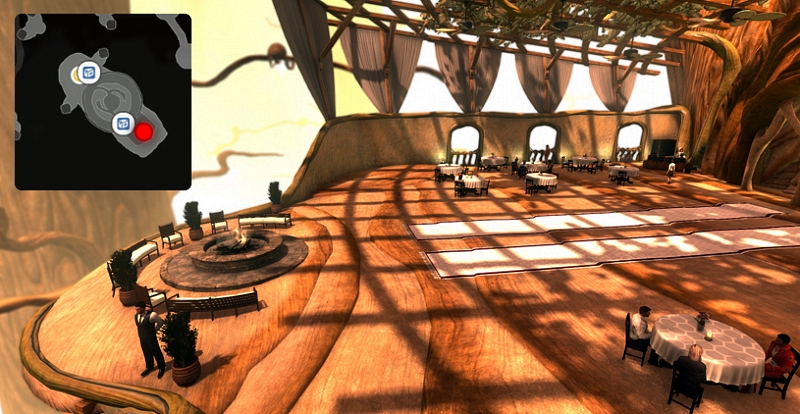
The Rooted Groove in Agartha is a great place to host events or join in on one, or simply meet and talk with other players.
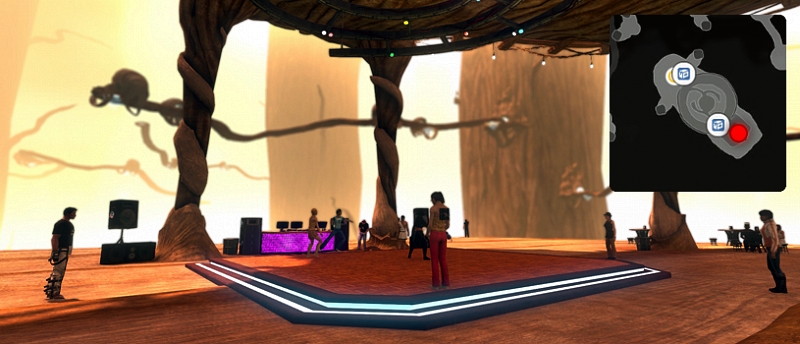
Axel's, which is located directly above The Rooted Groove, is also a great place to host an event. Engage in conversation with other players at a table or around the campfire.
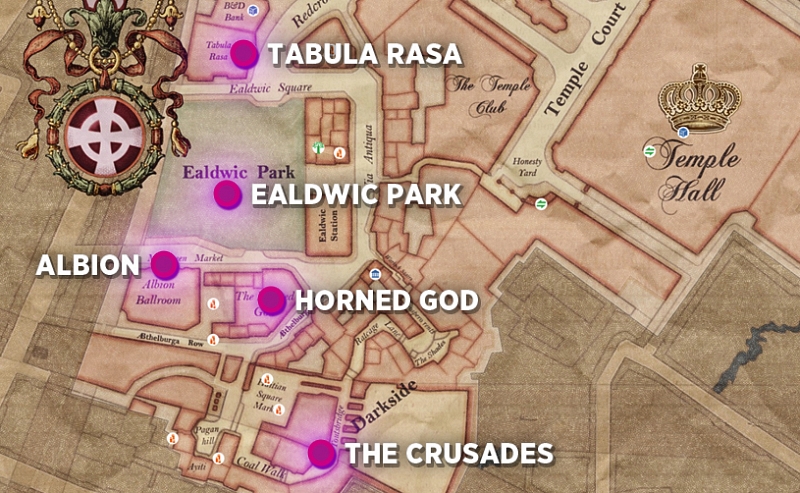
Ealdwic Park in London is currently the best place to engage in random roleplaying. If you can't find any players roleplaying there, it might be that you're in the wrong dimension. Ask in the #SWLRP or #OOC channels if there's someone you can meet up on.
The other locations in London are frequently used for hosting events. Refer to the map below for an overview of all the locations.
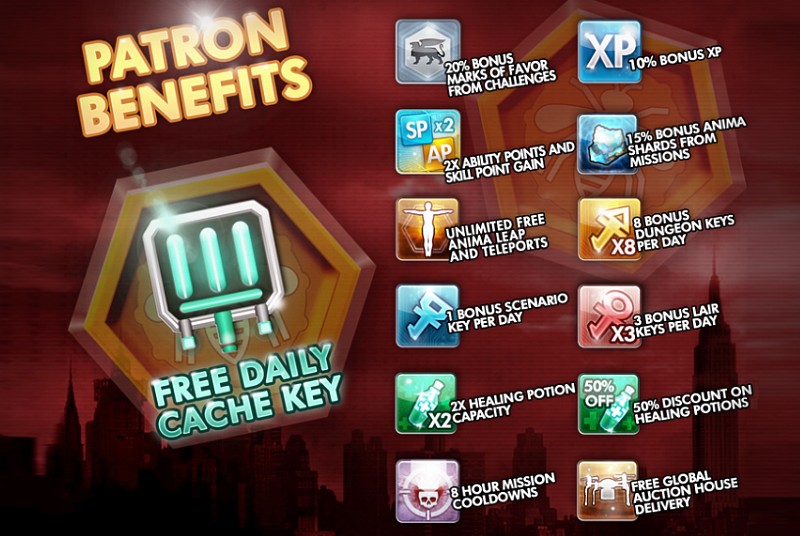
Patron Rewards
Even though this game is Free to Play, it comes with the option to subscribe for some additional benefits and conveniences, some of which have been pointed out numerous times in this guide already. For a complete overview, check out the image below.
Miscellaneous
Tips and Tricks
Below you will find some general trivia and tricks:
You can dodge ahead by double-tapping the forward arrow or (W) key, backward with the back arrow or (S) key, left with the (A) key, and right with the (D) key. Don’t forget to move and dodge during combat – you can take up to a third less damage if you keep moving; avoid the white telegraphs. Abilities can be cast while moving.
Some items that you have purchased, won, been gifted or acquired through some other method, may need to be claimed before you can access them on your character. Although Delivered Items are accessible from a popup in the bottom right corner of the screen from time to time, you can access the Delivered Items window through the menu in the upper-left corner of the screen or by using the /delivereditems command.